Crawl Space Encapsulation Before and After: 6 Changes to Expect
Crawl space encapsulation before and after photos show part of the story. The biggest changes are the ones a camera misses: humidity, smell and air quality. Here are six changes you can reasonably expect, and how to record them so you can check the work yourself.
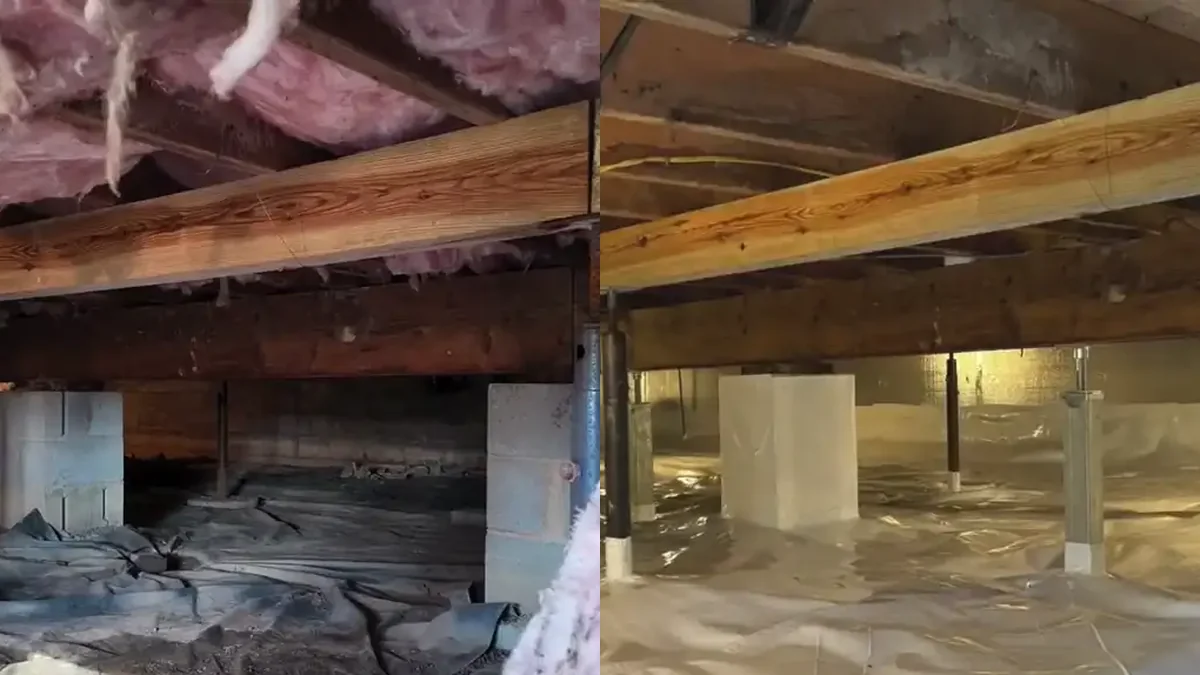
1. The ground goes from bare dirt to a continuous liner
Before, you typically see exposed soil, scattered debris and sometimes standing water or mud. After, the floor is covered with a reinforced liner, seams are taped and the edges run up the walls. The surface should look uniform, with no loose sheets and no gaps at piers or pipes.
2. The space looks cleaner and brighter
Old, damp insulation, torn plastic and trash are removed. A white or light liner reflects light, which makes inspections easier. If your contractor adds lighting, you can see the whole space from the access door without crawling in.
3. Humidity drops and stays steady
This one matters most. A vented crawl space in humid weather can sit well above the range most guidance calls comfortable. After sealing and adding a dehumidifier, readings should settle into a steadier, lower band. The humidity guide explains how to measure it with an inexpensive hygrometer.
4. Musty odors fade
Smells rise into the living space through gaps in the floor. Once moisture is controlled and damp material is gone, odors usually decline over days to weeks. If a smell lingers, there may be a hidden source. Our crawl space smell guide covers the common causes.
5. Pests and mold have less to work with
Moisture is the fuel for mold, rot and many insects. Removing it does not guarantee a pest-free space, but it takes away conditions pests prefer. The EPA notes that controlling moisture is the key to mold control. Visible growth should be addressed before sealing, not just covered.
6. Comfort and energy use may improve
Sealing the space and adding insulation where appropriate can reduce drafts and cold floors. ENERGY STAR’s page on sealing and insulating crawl spaces links to practical guides for closing and insulating them. Savings vary by home, so treat any promised percentage with caution.
How to document your own crawl space encapsulation before and after
Before work starts, take wide photos from the access door, close-ups of problem areas and a video walk-through. Write down humidity and temperature readings at the same spot. After the job, repeat the same shots and readings, then check again after a rainy week and again in the next season. With photos in hand, it is much easier to raise a problem with the contractor or make a warranty claim. Pair this with the contractor checklist before you hire.
What a before and after cannot show
A clean finish can hide poor seams or a missing drain, so look beyond the photo. Ask for close-ups of seams and penetrations and for the dehumidifier model. If anything looks off, review the common mistakes before making the final payment.
Talk to a local crawl space pro
Call now to describe your crawl space and get a free, no-obligation estimate from an independent local contractor.
Free estimate. No obligation.
Frequently asked questions
How long until I notice a difference?
Humidity readings can change within days of sealing the space and running a dehumidifier. Odors and comfort usually take a few weeks to improve, because damp materials need time to dry and air from under the floor needs time to clear. A reading that stays high after that deserves a follow-up.
Will my energy bill drop?
It might, but results vary by home, climate and what else was done. Sealing and insulating can reduce drafts and the load on heating and cooling, yet savings depend on your house. Treat any promised percentage with caution and track your own bills before and after.
Do I need to check the space after the job?
Yes. After encapsulation, check the liner and the dehumidifier a couple of times a year and watch the humidity reading through the seasons. Look for torn seams, standing water, a blocked drain or a unit that has stopped running, and keep your photos for any warranty claim.
What if the humidity stays high?
If crawl space humidity stays high after the job, contact the contractor in writing, share your readings and photos, and ask them to inspect the seams, vents, drain and dehumidifier. Many warranties require prompt notice, so do not wait. An independent inspector can help if the answer is unclear.
Talk to a local crawl space pro
Call now to describe your crawl space and get a free, no-obligation estimate from an independent local contractor.
Free estimate. No obligation.
Crawl Space Saver is a free referral service. We are not a contractor. We connect homeowners with independent local crawl space professionals, who set their own prices and do the work.